With so many options and customization possibilities in Joomla installing a template manually can be a time-consuming yet rewarding task. Of course, there are alternative options such as our Quickstart package, which will help you get a full Joomla site that matches our demo layout and functionality in minutes. However, these full Joomla install packages are not always the best option for established websites which have a lot of content or customization in place that would be hard to backup and replicate in a new site. Not to worry though; if you’re not able to use the quickstart installation method this guide is on hand to lead you through installing a template manually in an existing Joomla instance.
Choosing your Install method
Installing templates in Joomla 3 is generally a very simple process that takes only a few moments; the more time-consuming part is configuring the plugins and modules that provide the extra functionality and layouts that you can see in our demo site. For this reason, if possible we recommend that you install a new copy of Joomla with all the demo content in place with our quickstart package. However, if you have an existing site and can’t or don’t wish to start afresh, then manual installation of the template is the way to go. Let’s take a look at what steps you’ll need to take to get your template installed.
Manual Installation Steps
The number of steps required in manual template installation depends heavily on what exactly you’re looking to achieve. Are you looking to completely match the demo layout of the template, or do you want to build your own layout using the same basic functionality? Are you intending to make use of the modules demonstrated in the test site, or do you have your own modules ready to go? However, regardless of how much you want to do, there are two steps that you’ll need to take no matter whether you’re intending to match the demo layout or start building your own template-specific content from scratch:
- Install the core template package.
- Install the framework plugins.
In this article we’ll cover both these steps, as they’re almost essential to laying the groundwork for any custom content based on our templates. Once these are complete you can then start adding modules, installing extensions; basically, you can start building your site.
Installing the Core Joomla Template Package
What’s the core template package? It’s the zip file that contains the main files and folders for the template, including the CSS, PHP and JavaScript code and more. This step is a remarkably easy one thanks to Joomla treating template packages much like any other extension for an efficient installation. First, you’ll need to grab the right package for your chosen template. Make sure you’re logged-in to our website and head over to the download section & click on your chosen template. You’ll see a set of files for download. Some of these you will certainly need, whilst others you might only need if you are intending to fulfill some additional steps beyond the basic install. The files will usually be as follows:
- gk_templateName_J!x.zip – This package, where “templateName” is the name of the template and “x” is the Joomla version (i.e. J!3), is the core template package, and essential if you’re going to manually install the template. Make sure to download this package!
- gk_templateName_quickstart_J!x.zip – The quickstart package is for people who are installing a brand new Joomla installation with all demo content prepared; we don’t need this in manual installation so you can ignore it.
- gk_templateName_rest_files_J!x.zip – This package contains the source PSD files for the template and, more importantly, the plugins used to provide additional framework functionality like typography. It’s highly recommended you download this file too, as the plugins are usually a major part of the template functionality and should be installed.
To install Joomla template follow these steps:
- Login to your Joomla admin area as normal
- click on Install Extensions in the left menu, or Extensions → Extension Manager in the top menu.
- Once in the Extension Manager click on the Upload Package File tab:
![uploading template packages in joomla admin panel]()
- Click on the Choose file button and select your newly-downloaded template package for upload; that’s the gk_templateName_J!x.zip file and not the rest files; they’ll be used later.
- Once selected, hit the Upload & Install button to get started.
Wait a few seconds and the template should be uploaded and installed, ready for you to use.
What if it doesn’t complete installation?
If you find that you’re unable to complete the install via the above method, then an alternative method will need to be used. You might have encountered a JInstaller: “:Install: Cannot find XML setup file” error, or perhaps you’re trying to upload a package that’s larger than the maximum upload size; just bear in mind that one of the issues with any kind of computer-based system is that sometimes they go wrong, and it’s not always for an obvious reason. One extension might install flawlessly on one Joomla install, but breaks down completely when installed on another Joomla instance. So if you’re having trouble with the install don’t rush to blame your Joomla installation or the template; instead, try out these alternative methods first to see if you’re still getting the same issue, and remember that our dedicated team in our Support Forum are on hand to assist you further if you get completely stuck.
Manual Template Installation via the Discover Tool
If you’re a bit of a Joomla history buff, you might recall that it was entirely possible to install a template in Joomla 1.5 by just uploading the template folder and its contents to the templates folder in your Joomla installation. Nowadays in Joomla 3 things require an extra step to prevent accidental installation. That extra step is provided by the Discover tool, which can be found in the Joomla Extension Manager; when activated it will scan through its folders and find any extension, plugin or template that has its files on the server (in the appropriate install location) but hasn’t yet been activated or installed, and will activate them so they’re ready to use like you’ve just uploaded them as normal.
This installation method for templates isn’t particularly hard, but it does require access to your server via FTP since you’ll need to get the template files onto your server without going though the usual Joomla interface. First things first; remember the zipped-up template package you downloaded earlier? You’ll need to extract this package on your local machine before uploading; once extracted you should have a folder named after the template (for example “gk_msocial”) with all the template files inside. Next, connect to your server via the FTP program of your choice (if you’re unfamiliar with FTP you can find a beginner’s introduction on our blog to help you get to grips with it. Once connected, upload the extracted template folder to your /templates folder in your Joomla installation.
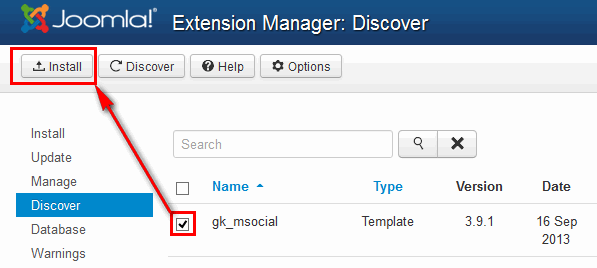
Once the upload is complete head back over to the Extension Manager of your Joomla admin area. Once there, click on the Discover tab in the left menu; Joomla will do a quick check to see if there are any unactivated extensions or templates in its folder. It should now detect your uploaded template and list it for activation.
![joomla 3 template manually installation]()
Now you can add a checkmark to the discovered template and click the Install button in the top-left to activate the theme.
After few seconds you should receive the installation success message (on green background).
![joomla_3_template_manually_install_2]()
And there you go; the template is now installed.
P.S. By the way, the Discover feature can also be used to discover and install multiple Joomla extensions at the same time.
Manually Installing a Joomla template from a directory
This method is almost identical to using the Discover tool; the only major difference is that the rather than Joomla finding an uploaded package and activating it, in this case it finds the uploaded package and installs it; that is, moves the important files from the directory to the proper install location. As such, which method you choose to use is entirely up to you, though in rare cases you may find one of the methods to be more successful than the other!
To install a template from a directory you’ll need to start by doing the same steps as with the Discover tool; extract your template zip package locally, and use FTP to upload it to your server. What’s different in this case is the upload location; instead of uploading the package directly to the /template folder, you should upload it to the /tmp folder of your Joomla installation, where Joomla stores files during installation or other file manipulation procedures. When you’ve finished uploading login to your Joomla admin panel and click on Extensions → Extension Manager as you do when uploading the package file, but click on the Install from directory tab instead. You will see a field labelled “Install Directory”; this defaults to the /tmp folder so you can leave it as it is and click the Install button.
The system will attempt to install the template, and if it is successful you’ll see a confirmation message.
![Installing Joomla template was successful]()
Now you’re all installed and ready to move on to the next step.
Installing Joomla Plugins
What’s the difference between a plugin and a module? In the case of our Joomla templates, plugins are used to expand the functionality of our Gavern Joomla Framework that powers our templates. Those extra features you find in all our templates, like great typography options, social media sharing of articles etc…? They’re made possible through plugins. As such, if you want the full experience of the framework it’s a good idea to install all the additional plugins. Thankfully, you can get the extra plugins installed just like templates and extensions, so it only takes a few seconds.
The plugins for the template framework are included in the rest files download package for your chosen template; you may recall that this was one of the recommended packages to download earlier in this article. Well, now’s the time to put it to use. Extract the rest files zip package on your local machine; inside the archive are three folders called modules, source and plugins. Naturally, we’re interested only in the plugins folder for now. Inside the folder you’ll find a set of approx. five zip packages with names such as Facebook, gk_typography etc…Each of these zip archives contains one of the plugins used by the framework.
To install, we’ll just follow the same steps as when installing the template:
- navigate to your Extension Manager in your Joomla admin panel,
- click on the Upload package file tab,
- click on Choose file and select one of the plugins,
- and finally click on Upload & Install to get it installed.
Repeat these step to install all of the plugins one-by-one; the plugins are lightweight so it’ll only take you a few moments before everything’s installed.
![List of Joomla template framework plugins]()
Next up, you’ll need to activate the plugins you’ve just installed or they won’t actually do anything useful! In your Joomla backend navigate to your Extensions → Plugin Manager section; you’ll see a list of installed plugins. Now you’ll need to find your new plugins in the list and change them from disabled (red “x” in the status column) to enabled (green tick in the status column) by clicking on them individually, or bulk-changing them by adding a checkmark to each plugin you want to activate and clicking the Enable button at the top of the screen. Your plugins are now installed and your template is ready for content to be added to it.
![Activating Joomla template framework plugins]()
What comes next?
Your template is installed, the plugins have been added and activated; what’s the next step? This will likely be different for every user since you’ll all be aiming for different goals, but there are a few things you can look to do. If you’re aiming to match the demo layout exactly, then it’s a good idea to import the template settings; the JSON file that contains the settings is available from each template’s Configuration Page where you may also find details of what modules are placed where along with their content and individual settings, which you’ll need if you’re trying to achieve the same layout. Even if you’re looking to make your own content separate from the standard demo layout it’s still worth installing any modules used in the demo; all GavickPro’s modules offer powerful features while being open-source and free to download, so head on over to our Joomla Modules download page if you want to get started. Have fun, make the most that you can with our great templates, and don’t forget that we’re here to help in our support forum if you run into any issues when using your template!
The post A guide to manual Joomla template installation appeared first on GavickPro Documentation.


 Go to User Manager and click on your account name, change your editor to “Code Mirror” or “No editor” and use Save button to apply changes.


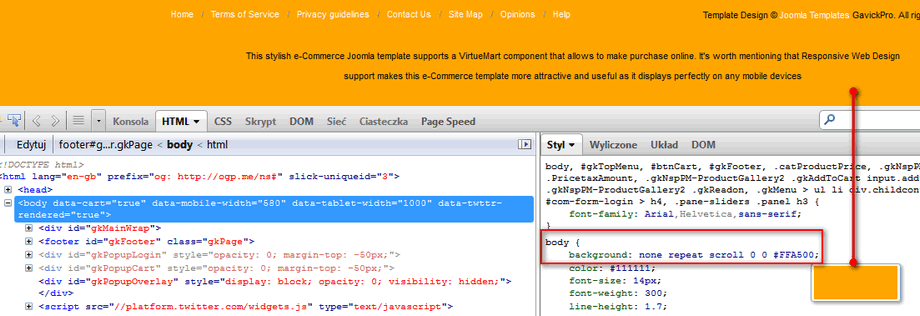
 color of footer element")


